Overview
In this article, we will learn how we can make HTTP Post with SIM7600 GSM 4G LTE & Arduino. We will use SIM7600 4G LTE commands with Arduino and send the DHT11 Sensor data to Thingspeak Server.
Earlier we made an HTTP post request using SIM800/900 2G GSM Module. But 2G GSM/GPRS service is closed in most countries & regions, such as Australia or Canada. But there are indeed some projects that need remotely wireless communication, or access to the Internet. Considering the wireless communication, for most cases, LTE 4G is still a proper solution.
Therefore SIM7600 4G LTE Module is a solution for all those 2G Modems. The 4G GSM LTE Module allows you to add location-tracking, voice, text, SMS, and data to your application. The big advantage of 4G LTE Modem Connectivity is, it covers a wide area and signal/connectivity is available almost everywhere.
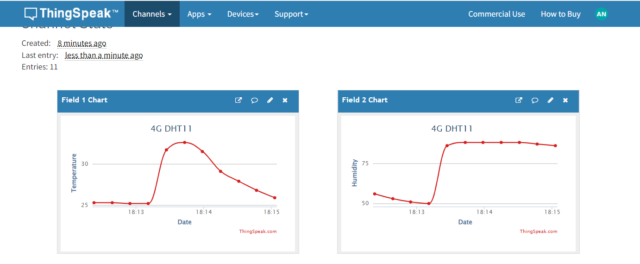
In this project, we will learn about the Internet of Things using 4G LTE Module also called as Cellular IoT. Using the SIM7600 LTE AT Commands with HTTP Post method, the humidity & temperature data will be sent to Thingspeak server.
Bill of Materials
| S.N. | COMPONENTS | DESCRIPTION | QUANTITY | PURCHASE LINK |
|---|---|---|---|---|
| 1 | SIM7600 Board | Maduino Zero 4G LTE(SIM7600X) | 1 | Makerfabs Link |
| 3 | DHT11 Sensor | Humidity & Temperature Sensor | 1 | https://amzn.to/3md8INc |
| 2 | Connecting Wires | Male-to-Female Jumpers | 1 | https://amzn.to/3j46Dks |
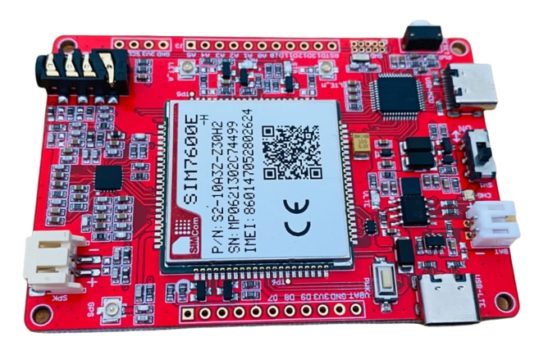
SIM7600 4G LTE Arduino Cutomized Board
The SIM7600A-H/SIM7600E-H is a complete multi-band LTE-FDD/LTE-TDD/HSPA+ /UMTS/EDGE/GPRS/GSM module solution in LCC type. It supports LTE CAT4 up to 150Mbps for downlink and 50Mbps for uplink data transfer, much faster and popular than 2G/3G.
You can purchase this board from Maduino Zero 4G LTE(SIM7600X) as it is manufactured by Makerfabs.
Makerfabs Maduino Zero 4G LTE module is based on ATSAMD21G18A microcontroller, which is Arduino compatible. Hence you can use Arduino IDE to operate and program the SIM7600 Module or make HTTP Post. The front and back side of the board looks something like this.
On the front side you can connect a 3.7V Lithium-Ion Battery to the battery connector. The switch can be used to turn ON/OFF the module. There are two USB TypeC ports, one for microcontrollers and the other for LTE. There are two pushbuttons used for MCU & LTE reset. The stat LED indicates the network connectivity status. You can connect 3 antennas to the board which are the main antenna, auxiliary antenna, and a GPS antenna. A 3.5mm Jack can be used to connect mic or earphones and an audio jack can be used for connecting speakers.
On the backside, there is a micro-sim slot for inserting a 4G SIM Card. There is a pair of SD Card slots, one for Microcontroller and the other for SIM7600.
Note: Don’t plug or unplug the Antenna, SIM Cars, SD Card when the device is powered on. It may result in short-circuiting that may burn the IC down.
HTTP Post with SIM7600 & Arduino
Now let use use the SIM7600 & Arduino to send the DHT11 Sensor data to Thingpspeak Server. For this we will use HTTP Post method and with SIM7600 AT Commands. We already tested the AT commands for checking HTTP Data in previous post. You can refere to Testing SIM7600 AT Commands from SIM7600 basics.
Hardware Connections
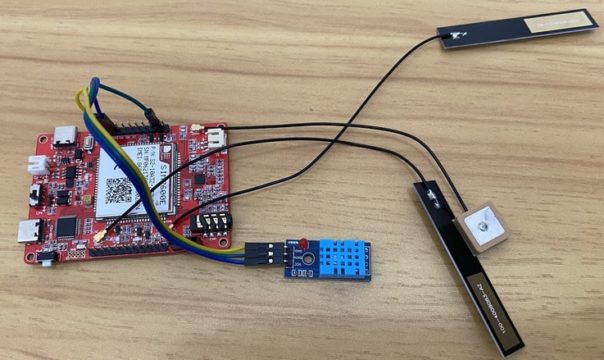
We will use DHT11 Humidity and Temperature Sensor for this purpose. The DHT11 is a basic, ultra low-cost digital temperature and humidity sensor. It uses a capacitive humidity sensor and a thermistor to measure the surrounding air and spits out a digital signal on the data pin.
Connect the VCC & GND Pin of DHT11 to the Board 3.3V & GND Pin. Similarly, connect the output pin of the sensor to the board D3 Pin which is a digital pin of Arduino.
Setting up Arduino IDE
The ATSAMD21G18A board isn’t pre-installed in the Arduino IDE. So, we need to install “Arduino Zero Board” from the Board Manager.
Open the Boards Manager From the top Arduino IDE menu, select Tools-> Board-> Boards Manager… to open the Boards Manager dialog box. Then install Arduino SAMD Boards(32-bits ARM Cortex-M0+).
Once, installation is completed, you can now select the Arduino Zero board as shown in the image below. To program this Board you need to connect USB TypeC Data Cable.
Setting up Thingspeak
ThingSpeak provides very good tool for IoT based projects. By using the ThingSpeak site, we can monitor our data and control our system over the Internet, using the Channels and web pages provided by ThingSpeak. So first you need to sign up for ThingSpeak. So visit https://thingspeak.com and create an account.
Then create a new channel and set up a widget for DHT11 Humidity and Temperature Value.
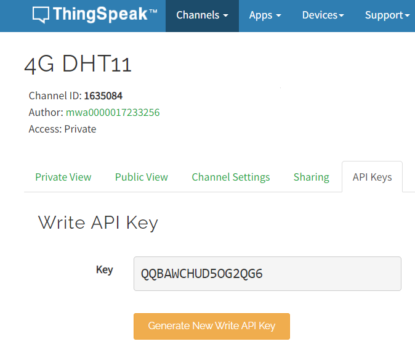
Then create the API keys. This key is required for programming modifications and setting your data.
Source Code/Program to make SIM7600 HTTP Post
The following Arduino code is used for making SIM7600 HTTP Post request. Copy the following code and make some changes as indicated.
Change the Apikey with the API Key of your Thingspeak Server.
In the following line, change the APN with the APN of your SIM Card cellular Network Provider.
Here is the complete code. You can upload it to the ATSAMD Controller with a native USB port.
Testing & Results
After uploading the code, wait for the blue light to blink on the board.
Then open your Serial Monitor. The Serial Monitor should show the following output.
This means your 4G modem is working fine. Sometimes it shows a 204. The number 204 is not an error code; it means that the server has successfully fulfilled your request, but has nothing to send in response. It is basically (and very loosely) an ACK without further comment.


No comments:
Post a Comment