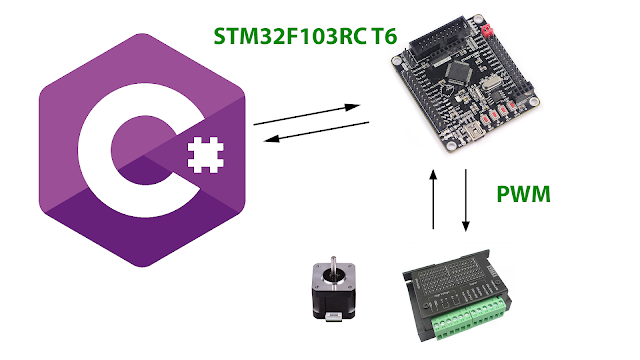
Mạch Điều Khiển Động Cơ Bước TB6600 sử dụng IC TB6600HQ/HG, dùng cho các loại động cơ bước: 42/57/86 2 pha hoặc 4 dây có dòng tải là 4A/42VDC. Ứng dụng của mạch điều khiển động cơ bước TB6600 trong làm máy như CNC, Laser hay các máy tự động khác.
THÔNG SỐ KỸ THUẬT
+ Nguồn đầu vào là 9V – 42V.
+ Dòng cấp tối đa là 4A.
+ Ngõ vào có cách ly quang, tốc độ cao.
+ Có tích hợp đo quá dòng quá áp.
+ Cân nặng: 200G.
+ Kích thước: 96 * 71 * 37mm.
Cài đặt và ghép nối:
DC+: Nối với nguồn điện từ 9 – 40VDC
DC- : Điện áp (-) âm của nguồn
A+ và A -: Nối vào cặp cuộn dây của động cơ bước
B+ và B- : Nối với cặp cuộn dây còn lại của động cơ
PUL+: Tín hiệu cấp xung điều khiển tốc độ (+5V) từ BOB cho M6600
PUL-: Tín hiệu cấp xung điều khiển tốc độ (-) từ BOB cho M6600
DIR+: Tín hiệu cấp xung đảo chiều (+5V) từ BOB cho M6600
DIR-: Tín hiệu cấp xung đảo chiều (-) từ BOB cho M6600
ENA+ và ENA -: khi cấp tín hiệu cho cặp này động cơ sẽ không có lực momen giữ và quay nữa
Có thể đấu tín hiệu dương (+) chung hoặc tín hiệu âm (-) chung
| I(A) | SW4 | SW5 | SW6 |
| 4.0 | 1 | 1 | 1 |
3.5 | 0 | 1 | 1 |
| 3.0 | 1 | 0 | 1 |
| 2.5 | 0 | 0 | 1 |
| 2.0 | 1 | 1 | 0 |
| 1.5 | 0 | 1 | 0 |
| 1.0 | 1 | 0 | 0 |
| 0.5 | 0 | 0 | 0 |
| Micro | Pulse/rev | SW1 | SW2 | SW3 |
| OFF | 0 | 0 | 0 | 0 |
| 1 | 200 | 0 | 0 | 1 |
| 1/2A | 400 | 0 | 1 | 0 |
| 1/2B | 400 | 0 | 1 | 1 |
| 1/4 | 800 | 1 | 0 | 0 |
| 1/8 | 1600 | 1 | 0 | 1 |
| 1/16 | 3200 | 1 | 1 | 0 |
| OFF | 0 | 1 | 1 | 1 |
/*
  Kết nối:
          TB6600                  STM32F103RCT6
           ENA+                      PB11
           DIR+                      PB12
           PUL+                      PB13
           ENA-                     GND
           DIR-                     GND
           PUL-                     GND

  A+ A- B+ B- kết nối với động cơ

  Nguồn đầu vào là 9V - 42V.
 */
Code STM32F103RCT6
///////////////////////////////////////////////////////////////////////////////////////////////////////#include <Arduino.h>
#include <HardwareTimer.h>
#include <HardwareSerial.h>

#define PIN_EN PB11
#define PIN_DIR PB12
#define PIN_PUL PB13

HardwareSerial Serial_Mon(PA10, PA9);
HardwareTimer timer1(TIM1);

volatile uint16_t init_value_timer1 = 300;
volatile uint16_t target_pulse = 3200;
volatile uint16_t current_pulse = 0;
volatile bool state = false;
volatile bool step_on = true;

String message = "";

void pwm(){
  state = !state;
  digitalWrite(PIN_PUL, state);
  current_pulse++;
  if (current_pulse / 2 > target_pulse)
  {
    current_pulse = 0;
    timer1.pause();
  }
}

void revDataFromUart()
{
  if (Serial_Mon.available())
  {
    char c = (char)Serial_Mon.read();
    if (c != '\n')
    {
      message += c;
    }
    else
    {
      if (message.length() > 0)
      {
        if (message.substring(0, 1) == "P")
        {
          target_pulse = message.substring(1).toInt() * 3200;
        }
        if (message.substring(0, 1) == "S")
        {
          timer1.resume();
        }
        if (message.substring(0, 1) == "X")
        {
          timer1.pause();
        }
        if (message.substring(0, 1) == "F")
        {
          init_value_timer1 = message.substring(1).toInt();
          timer1.setOverflow(init_value_timer1);

        }
        if (message.substring(0, 1) == "O")
        {
          step_on = !step_on;
        }
        if (message.substring(0, 1) == "D")
        {
          digitalWrite(PIN_DIR, message.substring(1).toInt());
        }
        message = "";
      }
    }
  }
}

void setup()
{
  Serial_Mon.begin(9600);
  pinMode(PIN_EN, OUTPUT);
  pinMode(PIN_DIR, OUTPUT);
  pinMode(PIN_PUL, OUTPUT);

  timer1.setPrescaleFactor(64); // Set prescaler to 64 => timer frequency = 64MHz/64 = 1,000,000 Hz (from prediv'd by 1 clocksource of 64 MHz)
  timer1.setOverflow(init_value_timer1);          // Set overflow to 10 => timer frequency = 1,000,000 Hz / 10 = 100,000 Hz
  timer1.attachInterrupt(pwm);
  timer1.refresh();
  timer1.resume();
}

void loop()
{
  revDataFromUart();
  digitalWrite(PIN_EN, step_on);
}///////////////////////////////////////////////////////////////////////////////////////////////////////
Code C#
///////////////////////////////////////////////////////////////////////////////////////////////////////using System;using System.Windows.Forms;using System.IO.Ports;namespace TB6600_Arduino{public partial class Form1 : Form{SerialPort portArduino;public Form1(){InitializeComponent();}private void Form1_Load(object sender, EventArgs e){try{portArduino = new SerialPort("COM6", 9600, Parity.None, 8, StopBits.One);portArduino.Open();}catch (Exception ex){MessageBox.Show(ex.Message);}}private void btnRun_Click(object sender, EventArgs e){if (portArduino.IsOpen){portArduino.WriteLine("S");}}private void btnWrite_Click(object sender, EventArgs e){if (portArduino.IsOpen){portArduino.WriteLine("P" + textBoxNumRotary.Text);portArduino.WriteLine("F" + trackBar1.Value);}}private void trackBar1_Scroll(object sender, EventArgs e){if (portArduino.IsOpen){int value = trackBar1.Maximum - trackBar1.Value + trackBar1.Minimum;portArduino.WriteLine("F" + value);}}private void btnStop_Click(object sender, EventArgs e){if (portArduino.IsOpen){portArduino.WriteLine("X");}}private void btnOnOff_Click(object sender, EventArgs e){if (portArduino.IsOpen){portArduino.WriteLine("O");}}private void radioButton1_CheckedChanged(object sender, EventArgs e){if (portArduino.IsOpen){portArduino.WriteLine("D1");}}private void radioButton2_CheckedChanged(object sender, EventArgs e){if (portArduino.IsOpen){portArduino.WriteLine("D0");}}}}///////////////////////////////////////////////////////////////////////////////////////////////////////
Video hướng dẫn
Chúc các bạn thành công!


No comments:
Post a Comment